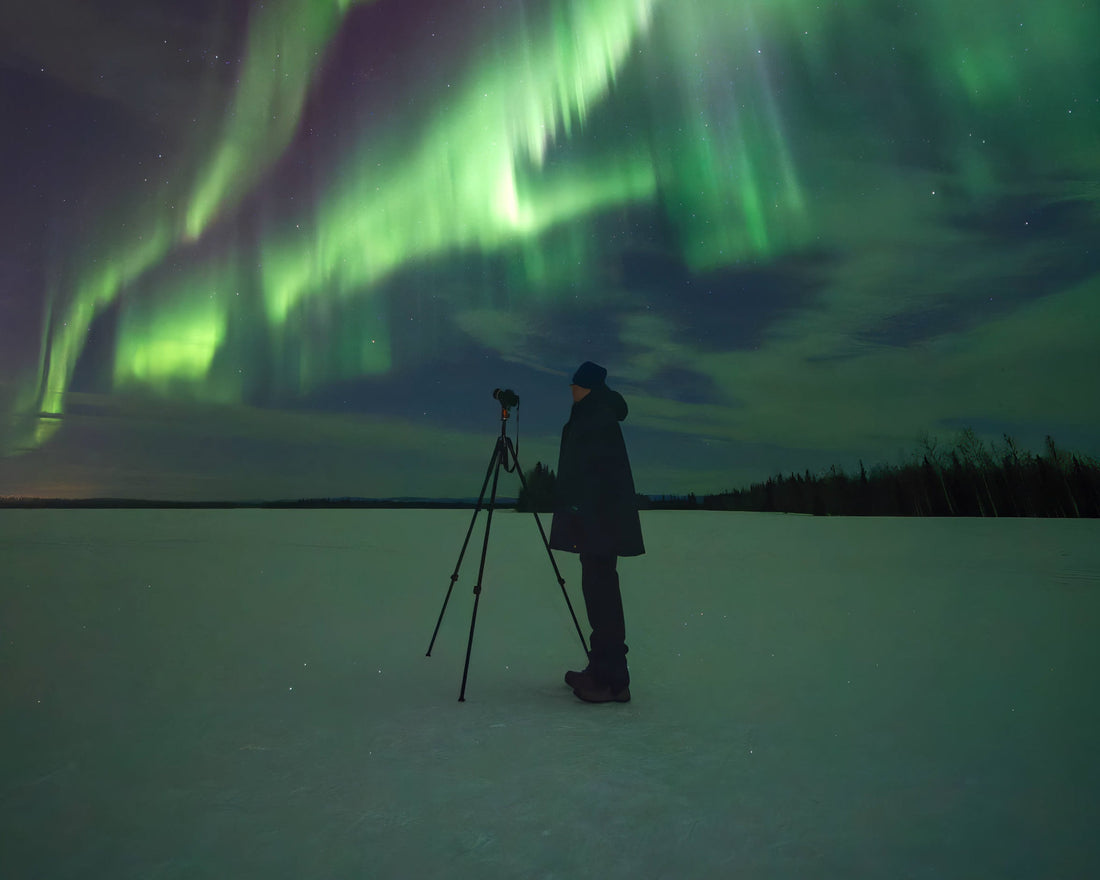
(Banner photo for this blog was captured by Michael Schultz with Face the Outdoors. Book an aurora tour with Mike and visit his website to learn about his workshops!)
Capturing the northern lights has been a passion of mine since I first saw the aurora at age four, and it's something I've dedicated my life to studying, photographing, and helping others experience. Over the years, through countless nights under the stars and the vibrant colors of the aurora, I've learned just how crucial having the right gear is to produce higher-quality photographs.

Auroral substorm over the Alaska Pipeline near Coldfoot, Alaska
In this post, I'll share my recommendations for the best camera gear - cameras, lenses, and tripods - at multiple price points that can take your aurora photography to the next level. These suggestions are based on years of experience running aurora tours and workshops and discussions with fellow photographers and aurora chasers. If you’re looking for recommendations on cold weather gear and other accessories, don’t worry, I’ll have a blog post on those items soon.
Let's dive in!
What should you look for in a camera and lens?

What cameras or lenses are best is an important question, but one that gets too much attention, in my opinion. If you are a professional photographer printing mural-sized photos, then gear matters a lot to you, but for most people, small quality differences in camera bodies or lenses won’t be noticeable. The energy you devote to buying the “best” camera or lens may be better invested in becoming a better aurora chaser. After all, even with the fanciest gear, it won’t matter if you don’t see the aurora. Still, you should have a general idea of what makes a good camera body and lens so you don’t waste your hard-earned money.
Camera

While smartphones today can capture decent aurora photos, investing in a professional camera with a larger sensor and manual settings will significantly enhance your results. You'll achieve greater image quality, more detail in low-light conditions, and overall better performance for night-sky photography.

Smartphones can do a great job when the aurora is bright, but in the photo above, a weak yet colorful aurora looks much more impressive when photographed with a professional camera.
All modern camera options from Sony, Nikon, and Canon can capture excellent aurora photos, and the differences among these brands' recent camera models are very minimal. In the early days of mirrorless photography, Sony held a clear lead, but now each major brand has a robust mirrorless lineup with extensive lens selections.
Professional cameras have different sensor types like Micro 4/3, APS-C, Full Frame, and Medium Format. These names refer to the size of the sensor. The pixels on sensors act as little wells that collect light when you take a photo. While auroras can appear bright, they are still much dimmer than any scene during the daytime, so maximizing the amount of light you can gather in a single photo is important for minimizing noise in your shot.


Common sensor sizes compared.
Larger sensors are not always better, but in general, larger sensors have larger pixels/light wells that can capture more light in the same amount of time. A camera’s megapixel (MP) count (resolution) determines how many of these wells can fit on the sensor. If there are two modern full-frame cameras, one with 24 MP and one with 60 MP, the 24 MP will probably perform better for night photography because its pixels are larger (less pixels occupying the same sensor area means they are larger). Two recently-released 24 MP full-frame cameras will probably perform similarly, but a camera from 2010 will probably perform worse than one released this year. Over time, manufacturers have made strides in sensor technology that generally make newer models more capable than older ones.
For more information on how camera sensors work, please read my detailed blog article on ISO.
The aurora is not that technically-demanding of a subject to photograph. This is different from photographing the milky way which is extremely faint or the moon which benefits from having expensive telephoto lenses. There will always be benefits to using more capable (and expensive) cameras, but if you are okay with a little noise or shooting with a longer shutter speed, auroras can be photographed with almost any digital camera. After leading many aurora workshops with people using everything from an iPhone 10 to a $10,000 medium format camera, regardless of how much money someone spent on their gear, they were able to capture a photo of the aurora they loved.
However, if you are shopping for a new camera, there are some features you should look out for that can make the photography process more efficient and seamless.
1. Mirrorless design

Mirrorless (left) vs. DSLR (right). Credit: Cameralabs
This isn’t as much of a feature as a class of camera, but mirrorless cameras are just that - cameras without a reflex mirror, or DSLRs, the “R” standing for reflex. Mirrorless cameras are generally more compact and lighter than DSLRs and offer more lens selection since DSLR lenses from any manufacturer can be adapted to mirrorless bodies. What’s great about these cameras is that they have much higher-quality LIVE views and viewfinders. This higher-quality readout allows you to see more on your camera when you are focusing and framing your composition in the dark.
2. Night-friendly controls

“Night mode” on the Nikon Z8.
Some cameras like the Nikon Z8 have illuminated buttons and a “dark mode” with red text and menus to preserve night vision. While the aurora can be bright enough at times to cast shadows, if you are setting up in the dark before the show begins, it’s hard to figure out where your buttons are on your camera. Light-up buttons are super helpful to see what you’re doing and get up and running quickly!
3. Long battery life
Most DSLR cameras have relatively low power consumption and large batteries, meaning they can last hundreds or even thousands of shots before shutting down. Mirrorless cameras are catching up, but because of their smaller form factor and more power-hungry electronics, their battery life can be shorter, sometimes annoyingly so. I was a proud owner of a Sony a7r ii which used the first-generation Sony NP-FW50 batteries, and while the sensor and image quality on that camera was incredible, the batteries didn’t last more than 100 shots in the cold. Even with a battery grip, which allowed me to use two batteries instead of only one, the batteries would get so cold that they could not power the camera to turn on in the cold. I sold my Sony a7r ii this year. Read reviews, especially from timelapse photographers, on how different cameras fare in the cold shooting for long periods of time, or try renting a camera and testing its battery life yourself.
4. Internal intervalometer

Internal intervalometer on a Canon camera.
If you want to record an aurora timelapse (tutorial here), you will need some sort of intervalometer to set your camera up for interval shooting. On most new cameras (DSLR and mirrorless), this functionality can be handled through your cameras’ menu systems, but on older models, you might need to purchase a standalone, external device that controls your camera. I prefer having everything in my camera, though, so that I can get a timelapse set up quickly without needing to remember or set up additional devices. More electronics exposed to cold conditions also increase chances of failure.
5. Dual memory card slots

Having two memory card slots allows you to double the capacity of images you can store on your camera when using two cards, or more importantly, allows you to record the same to two cards at once. If one of your memory cards dies, having a backup on your camera is more convenient than spending time using software to recover corrupted data. If you’re on a photography trip without the luxury of having a computer or chance to offload files, having two card slots can be the difference between losing an entire night or trip’s worth of photos… or not. If you have never suffered a corrupted SD card, then it’s not a matter of if, but when. It will happen to you eventually.
Features you don’t need?
1. 8K video
Shooting 8K sounds cool, but your videos will look like TV static when you try and push things to see in the dark. Remember the discussion earlier about pixel size and light-gathering ability? 8K images are over 36 megapixels - tiny, tiny wells collecting light. That won’t jive well with auroras which demand a lot from your sensor for real-time video.
2. In-camera star tracking
Almost all mirrorless camera sensors have in-body image stabilization which physically moves the camera sensor to compensate for your shaky hands. Some manufacturers have used this function to add a star tracking feature which rotates the sensor at the same rate as the Earth. This allows you to use long shutter speeds of a few minutes which can improve the quality of your photos and opens the opportunity for deep-space astrophotography without a telescope. For auroras? You don’t need any of that. Shutter speeds are typically 5-15 seconds which are not long enough to cause star trailing.
3. High frame-rate shooting
Some of the most expensive cameras are so pricey because they are geared towards sports shooters who need high-frame rate capture > 10 frames/second. Since we are shooting long exposures, we will never need such features.
Lens

Investing in a good lens often makes a bigger impact on your images than the camera body itself. For aurora photography, you'll want a lens that's sharp and handles issues like astigmatism (stars looking stretched), coma (stars appearing comet-shaped), and vignetting (dark corners) effectively. For detailed lens reviews specifically relevant to night sky photography, I recommend checking out Lenstip.com, which provides comprehensive assessments of lens performance, clearly highlighting these essential characteristics. Opt for lenses with large apertures (f-number of 2.8 or lower) to let in as much light as possible for higher-quality images.
The focal length of the lens, a distance measured in mm, relates to how “zoomed in” a lens is. Lower focal length lenses are wider angle which are preferred for landscape and aurora photography for showing the extent of an aurora that might fill the sky. Notably, lenses are marked and sold according to their 35 mm-equivalent focal lengths. Putting a 24 mm lens on a full-frame camera will give you a field of view like a 24 mm lens (84 degrees), but on Canon 60D, that lens will appear to have a 56.9-degree field of view acting like a 38.4 mm lens. This is because the 60D’s sensor is 1.6 times smaller (crop factor = 1.6) than full-frame.

Graphic by lensvid.com showing common sensor types and their crop factors.
I recommend a lens no longer (longer is slang for higher focal length) than 35 mm AFTER THE CROP FACTOR has been applied for aurora photography. While you will see stars and some aurora at 50 mm or longer, it will be hard to frame landscape elements like trees or mountains in your shot with aurora that is higher in the sky. I recommend focal lengths between 14 mm and 35 mm that will work for almost all situations under the aurora.

Image of a colorful aurora taken in March 2025 in Venetie, Alaska with a 14 mm lens.
Also note that some very wide-angle lenses are actually fisheye lenses which have severe distortion at the benefit of a large field of view. These lenses can see a very large part of the sky and offer a unique look, but just make sure you are okay with having warped edges or have a technique for reducing this distortion.

Image taken with a 12 mm fisheye lens showing a colorful red aurora in October 2024 near Fairbanks, Alaska. Notice the curved shoreline due to the distortion of the lens. No corrections have been applied.
Finally, prime or fixed focal length lenses typically have higher optical quality than zoom lenses. Because prime lenses are more “specialized” and also simpler to engineer, they are usually cheaper. Primes also have much larger maximum apertures than zoom lenses which usually don’t stop down faster than f/2.8. If at this point you’re confused about all these photography terms, I have a blog article “25 Important Photography Terms Everyone Must Know” that should provide some more context.
Before you buy…
While it may sound obvious, make sure that when you are buying a camera and lens that they are compatible with each other. DSLR-mount lenses (e.g., the Canon EF or Nikon F mount) are compatible with mirrorless cameras if you have the right adapter, but to make things easier, I recommend purchasing lenses with the same mount as your camera unless you have a specific optic in mind. Sony, Nikon, and Canon systems will have their own lenses which will work with their cameras, but “third-party” lenses from manufacturers like Sigma, Rokinon/Samyang, Laowa, and Tamron will often sell the same lens in multiple types of mounts.

Different types of lens mounts.
Also, make sure you buy lenses that will work with your sensor type. For example, lenses designed for APS-C cameras will create an image circle that will fill a crop sensor camera but not a full-frame sensor camera. This will result in vignetting and dark edges, making your image unusable. When you are shopping for lenses, it should be obvious in the listing what mount and sensor size the lens is made for. A full-frame lens will work just fine on an APS-C-sized sensor, though.

Diagram of what may happen when an APS-C lens is used on a full-frame camera. The image circle will not cover the entire sensor.
Whether you're just starting out or you're a seasoned photographer, there's suitable camera gear at every budget. I always suggest considering used equipment—this not only saves money but can also give you access to higher-quality gear at lower prices. Good places to find reliable used camera gear include eBay, MPB.com, Craigslist, and Facebook Marketplace. Make sure that if you meet someone in person to pick up gear that you do so in a public place.

eBay can have some great deals on cameras, especially if you are searching for models that are a few years old and have a built-up used market.
Used and new gear options also exist on popular online retailers like B&H, Adorama, and Amazon. I prefer to shop for new camera gear on Amazon since their return policy is the most liberal from my experience. If you prefer to support small businesses, check your local camera store for new and used gear. If you want to “try before you buy,” Lensrentals.com is my favorite site to rent gear. They even offer some gear to be purchased for a discount after your rental.
Here are my top camera and lens recommendations for capturing stunning aurora images at various price points:
Camera and lens recommendations by budget
Under $500:
(Prices may vary significantly due to the wide range on the used market, and $500 includes the camera AND lens together)
- Camera (crop sensor): Nikon D5300 (new), Canon EOS Rebel T6 (new), Sony a6000 (used)
- Camera (full frame): Canon EOS 6D (used), Nikon D750 (used), Sony a7 (used)
- Lens (crop sensor only): Rokinon 16 mm f/2.0 (new), Rokinon 10 mm f/2.8 (new)
- Lens (full frame): Rokinon 14mm f/2.8 (new), IRIX 15 mm f/2.4 Firefly (new)
For these low-cost setups, I highly recommend avoiding body+kit lens bundles unless the deal is too good to pass up. Kit lenses (e.g., 18-55 mm f/3.5-f/5.6) often have low optical quality and unimpressive max. aperture specifications.

The Rokinon 14 mm f/2.8 lens (also sold under the brand called Samyang) is one of the most popular astrophotography lenses ever with millions of copies sold. It is my recommended “starter lens” for anyone interested in trying milky way or aurora photography. One of my favorite reviewers, Phillip Reeve, has a nice summary of this lens on his blog. Since this lens was first announced over a decade ago, there have been more versions and iterations released with updated designs. Shotkit has a nice article that shares more about this.
Under $1000:
(all cameras and lenses are full-frame)
- Suggested Cameras: Nikon Z6 (used), Sony a7R (used), Sony a7s (used), Canon EOS RP (used), Nikon Z5 (used)
- Highlighted Lenses: Sigma 14mm f/1.8 DG HSM Art (used), Rokinon 24mm f/1.4 (used), Laowa 12 mm f/2.8 Zero-D (used), Laowa 15 mm f/2.0 Zero-D (used), Rokinon 18mm f/2.8 (new), Viltrox AF 24mm f/1.8 (new)
At this price point, there are so many more options than what you can get with $500 for a camera and lens which is why I have used the terms “suggested” and “highlighted.” My advice would be to shop for a used full-frame camera that’s a few years old and find a high-quality lens to pair with it. For example, the Canon EOS RP is frequently sold on eBay for around $600-$700, and an RF-mount Rokinon 14 mm f/2.8 can be found easily for around $300 new.
Under $2000:
-
Suggested Cameras: Sony a7 III (used), Canon EOS R6 (used but still a bit pricey), Canon EOS R8 (used)
-
Highlighted Lenses: Sony FE 20mm f/1.8 G (used), Nikon AF-S NIKKOR 14-24mm f/2.8G ED (used)
Other recommended lenses:
Sony:
Nikon mirrorless:
Canon mirrorless:
Available in multiple mounts:
- Tamron SP 15-30mm f/2.8 Di VC USD G2
- Tamron SP 35mm f/1.4 Di USD
- Sigma 14mm f/1.4 ART (Sony E and Leica L)
- Sigma 14-24mm f/2.8 DG DN Art (Sony E and Leica L)
- Sigma 20mm f/1.4 DG DN Art (Sony E and Leica L)
- Sigma 14-24mm f/2.8 DG HSM Art
- Sigma 15mm f/1.4 Fisheye DG DN Art (Sony E and Leica L)
- Laowa Argus 35mm f/0.95 FF (most useful for real-time video purposes)
Note: Only a few cameras can effectively record high-quality, real-time video of the aurora, including the Nikon Z6 III, Sony a7S III, Nikon Zf, and Sony a7 IV. Among these, the Sony a7s line stands out as the king of low-light video performance. I use a Sony a7s iii for recording all my real-time videos.
If you have a camera or lens you think should be added to the list above, let me know!
Tripods

Having a sturdy, heavy tripod is crucial for long-exposure photography, as it significantly reduces camera shake, ensuring sharper images. Additionally, choosing a tripod with a ball head that is easy to operate in cold temperatures and with gloves on can greatly improve your experience.
Since tripod reviews can be highly subjective, my recommended approach is to rent or borrow a few different models to see which one suits your needs and preferences best. Hands-on experience is the most reliable way to find the tripod that works best for you. Over the years, Benro carbon fiber tripods have proven to be reliable and sturdy for my uses, and they work well in the cold.
Other Accessories

Two intervalometers - a relatively simple model on the left vs the fancier (and more capable) Timelapse VIEW on the right. Credit: Petapixel.
If you’re planning on shooting an aurora timelapse, and your camera doesn’t have an internal intervalometer, you will want to pick up an external one to control your camera. I’ve personally purchased a JJC model to use with one of my old Sony cameras, but they have variations for almost every kind of camera.
Condensation and moisture can be annoying and cause your lens’ front element to fog up. This happens a lot at night in Fairbanks in September and October when there is a lot of humidity in the air. Some lenses have glass coatings to resist fog, but the best solution is to buy a lens warmer. There are many different models, but I have used the NEEWER-branded warmer, and it’s worked well. You will need to buy an external power bank to use with this particular one, though. Some lens warmers can be powered off your camera’s USB port, but be aware that they will drain your internal battery quickly.

Credit: BBC Sky at Night Magazine.
Final Tips
Before heading out, test all your gear to ensure everything works correctly. Especially if you are heading on an aurora chasing vacation up north, make sure you know how to take out your gear and quickly deploy it. On aurora chasing tours, sometimes you may have to jump out and catch a substorm, and in those situations, seconds matter!
This list is also current as of publishing, but over the course of a few years may become outdated. Join my email list to stay up to date on my latest blog articles and find out when I release an update to this article.
Call to Action
I hope you find these camera gear recommendations helpful for your next aurora adventure! If you have your own favorite gear or additional tips, please share them in the comments below or contact me by email. And don't forget to check out my e-book for more detailed guidance on aurora chasing and photography techniques. Happy chasing!
(Banner photo for this blog was shot by Mike with Face the Outdoors! Book an aurora tour with him if you're heading to Fairbanks this year. Visit his website to learn more about his workshops, too.)

1 comment
Focus seems important in low light. I find OM system starry sky autofocus to be invaluable!